Tuesday, 7 May 2013

Customize Magento’s Image Resize Functionality

Untitled Document

Need to remove the white border around your images? Don't want everything to be square? Here is how to customize the ->resize functionality in Magento. Here is what the default image resize code looks like:

<?php echo $this->helper('catalog/image')->init($_product, 'image')->resize(350) ?>

The problem is this will always give you a 350 x 350 pixel square. If your image is rectangular, you will get a white frame around it to make it square. The resize() command can be quickly and easily customized to work better with rectangular images.

->constrainOnly(true) This will not resize an image that is smaller than the dimensions inside the resize() part.

->keepAspectRatio(true) This will not distort the height/width of the image.

->keepFrame(false) This will not put a white frame around your image.

Here is what your image code would look like with all these set:

<?php echo $this->helper('catalog/image')->init($_product, 'image')->constrainOnly(true)->keepAspectRatio(true)->keepFrame(false)->resize(350, null) ?>

This would resize your images to a max 350 width and constrain the height. If your image is taller than it is wide, you will end up with a nicely resized vertical image.

Here are the various places that images are used:

/app/design/frontend/default/yourtheme/catalog/product/view/media.phtml  (displays the image on your product view page)
/app/design/frontend/default/yourtheme/catalog/product/list.phtml  (displays the image on category view)

This has helped us out many times. Let us know in the comments if you use it!

Magento : Get Upsell products list using Product Id .

In some situation when you need to show procuct in custom location file and in that file you also wanna show list of upsel product then this is example which will explain you.
For Example : Suppose you have Product ID and using that ID you want to accees upsell procust list then you can use following code :

1. Assume that you have product ID is : $product_id

2. Using that ID you can get list of Upsell product. Copy following code and place it in you custom file.


<?php
  
   // Get product object.
   $object = Mage::getModel('catalog/product');
  
   //Get product detail using product id  (Suppose you have product id is : $product_id)
   $_product = $object->load($product_id);
 
   // Fetch list of upsell product using query.
   $upsell_product = $_product->getUpSellProductCollection()->addAttributeToSort('position', Varien_Db_Select::SQL_ASC)->addStoreFilter();

   //check if record is empty or not
   $count = count($upsell_product);
   if(empty($count)) :
       //if empty
       echo "Record not found";

   else:

     //if result is not empty then get  upsell product detail using foreach loop
      foreach($upsell_product as $_upsell):
        
         //get detail of single upsell prdocut using upsell product id
         $upsp = $object->load($_upsell->getId());

         echo "Product Name : ". $upsp->getName();
         echo "Poduct url : ". $upsp->getProductUrl();
         echo "Product regular price : ". $upsp->getPrice();
        
       endforeach;
  
   endif;

?>

Get attribute name and value magento.

In magento you can create as many custom attributes for your products as you want.Suppose you want to add or display brand color for every product on home, category or product page. So this is very easy to do with custom attributes.

If we were to create a new custom attribute called “brand_color” and the attribute was of a “Text Field” type, we could do something like the following at a product level to obtain its value.

<?php echo $_product->getBrandColor(); ?>

Get attribute collection

<?php $attribute = $_product->getResource()->getAttribute('my_attribute'); ?>

Get attribute type

<?php $attribute = $_product->getResource()->getAttribute('my_attribute')->getAttributeType(); ?>

Get attribute Label

<?php $attribute = $_product->getResource()->getAttribute('my_attribute')->getFrontendLabel(); ?>

Attribute is visible or not

<?php $attribute = $_product->getResource()->getAttribute('my_attribute')->getIsVisible(); ?>

Attribute is required

<?php $attribute = $_product->getResource()->getAttribute('my_attribute')->getIsRequired(); ?>

Get attribute value

<?php $attributeValue = Mage::getModel('catalog/product')->load($_product->getId())->getMyAttribute();?>

Get the multi-select attribute values

<?php
$attributeId = Mage::getResourceModel('eav/entity_attribute')->getIdByCode('catalog_product','attribute_code_here');
$attribute = Mage::getModel('catalog/resource_eav_attribute')->load($attributeId);
$attributeOptions = $attribute ->getSource()->getAllOptions();
?>

Get specific attribute value

<?php
$attributeValue = Mage::getModel('catalog/product')
                            ->load($_product->getId())
                            ->getAttributeText('my_attribute');
?>

5 Useful Tricks For Your Magento local.xml

Untitled Document

We have covered a lot about Magento’s layout XML in our past 2 articles [1] [2]. We saw that Magento will read the layout XML files in a specific order and that the local.xml file is read at the very end of the sequence. This allows us to approach the implementation of new theme designs in a very modular and tidy way.

Most of the time, we would use one of the Magento supplied themes as a starting point for a new theme. The base default theme gives us all the standard theme features and implements the complete Magento layout and phtml files but the theme is almost completely unstyled. We can get a kick start from either the Magento default or modern themes, or if you installed a third party Magento design.

tidy magento layout

A minimalist layout folder

So we end up with a setup that we can work with but, often, we don’t want to use all the features, rearrange some of the features we want to keep and, most likely, add some of or own.

We know that we can just copy the selected starting design into a new design package and start modifying all the layout XML and phtml files but what if the original theme is updated with the next release or the theme designer (if using a third party theme) releases an update? To reduce the need to retrofit updates, we can plan our theme modifications better by putting all our layout modifications into our own local.xml file. As you can see from the example on the right, our layout folder is really minimalist and tidy. This way almost all of the original layout files are kept intact and, the added bonus is that you can see in one file what you have modified as opposed to hunting for your modifications in numerous layout files.

Working with local.xml is really no different to modifying the existing layout files, once you realize that any Magento layout file can target any layout handle. This means that we are really not going to tell you anything new if you are already familiar with modifying layout XML. Nevertheless, for the novice, these tricks may be useful and we hope that the more advanced will be able to take away some ideas too.

A general local.xml file will have the standard layout root element under which all the other layout handles will be nested:

1
2
3
4
5
6
7
8
9
10
11
12
13
14
15
<?xml version="1.0" encoding="UTF-8"?>
<!--
/**
 * local.xml
 *
 * Local layout modifications for our local theme
 *
 * @category    design
 * @package     my_theme_default
 * @copyright   Copyright (c) 2011 Magebase.
 */
-->
<layout version="0.1.0">
...
</layout>

1. Adding and removing scripts and stylesheets

One of the things I find doing quite often is adding and removing JavaScript and CSS includes. For example, some third party extensions install their own CSS with, maybe a few lines of styling. I prefer to move this into the main stylesheet and just not include the original. Similarly, sometimes I don’t want some JavaScript included on all or some pages. Also, if I develop some of my own JS, I need to include it. Clearly, for functionality you develop via a custom module, you may have already created a module specific layout XML file that will handle your custom includes, but if it’s a theme specific JS feature, you may want to be able to include it in your theme’s layout XML.

To include an arbitrary file, you need to decide whether it is going to be included on every page of your site or just on some. This will determine the layout handle you need to specify.

We will work with the <default> handle to include our example script my_js.js and style my_styles.css on every page. We’ll use the standard addItem action method for adding files and target all this in the "head" block reference since that’s where the files are included.

1
2
3
4
5
6
7
8
9
10
11
12
13
<default>
    <reference name="head">
        <action method="addItem">
            <type>skin_js</type>
            <name>js/my_js.js</name>
            <params/>
        </action>
        <action method="addItem">
            <type>skin_css</type>
            <name>css/my_styles.css</name>
        </action>
    </reference>
</default>

Similarly, to remove styles or scripts, use the removeItem action method:

1
2
3
4
5
6
7
8
9
10
11
12
<default>
    <reference name="head">
        <action method="removeItem">
            <type>skin_css</type>
            <name>css/brandext/slider.css</name>
        </action>
        <action method="removeItem">
            <type>js</type>
            <name>some_ext/jquery-1.4.2.js</name>
        </action>
    </reference>
</default>

Note that the second removeItem element targets a JavaScript file that was included by some extension under the Magento js folder rather than the theme folder.

2. Replacing a local jQuery include with one from the Google CDN

We saw how we can easily include/exclude JavaScript files in the previous section. We removed a locally included jQuery library with the goal to replace it with the same library file loaded from the Google CDN. This will hopefully improve our site’s performance a little.

1
2
3
4
5
6
7
8
9
10
<default>
    <reference name="head">
        <block type="core/text" name="google.cdn.jquery">
            <action method="setText">
                <text><![CDATA[<script type="text/javascript" src="https://ajax.googleapis.com/ajax/libs/jquery/1.4.2/jquery.min.js"></script><script type="text/javascript">jQuery.noConflict();</script>]]>
                </text>
            </action>
        </block>
    </reference>
</default>

In case you are wondering what’s going on here, closer inspection of the original included jQuery file showed that the jQuery.noConflict() call was added at the end of the file. This is required in order to avoid jQuery conflicting with the Magento built in Prototype library. Additionally, since the JavaScript file is being included from an external source, we can’t use the addItem action method.

To solve these problems in our replacement, we created a block of type core/text and added our script tag as a text node. The core/text block will automatically output the CDATA content into the head of our page since the default head.phtml has a call to: $this->getChildHtml().

3. Changing default block parameters

This somewhat cryptic section title refers to changing some default values in Magento template blocks such as the number of columns in the category grid or the number of upsell/crosssell products in their respective blocks.

Let’s start with changing the category grid:

1
2
3
4
5
6
7
8
9
10
11
12
13
14
15
16
17
18
19
20
21
<catalog_category_default>
    <reference name="product_list">
        <action method="setColumnCount">
            <count>3</count>
        </action>
    </reference>
</catalog_category_default>
<catalog_category_layered>
    <reference name="product_list">
        <action method="setColumnCount">
            <count>3</count>
        </action>
    </reference>
</catalog_category_layered>
<catalogsearch_result_index>
    <reference name="search_result_list">
        <action method="setColumnCount">
            <count>3</count>
        </action>
    </reference>
</catalogsearch_result_index>

Note that we have to find all the pages that show a product grid and change the column count otherwise, they will use the Magento default values.

Changing the upsell grid on the product view, for example, is also very simple:

1
2
3
4
5
6
7
8
9
10
11
<catalog_product_view>
    <reference name="upsell_products">
        <action method="setItemLimit">
            <type>upsell</type>
            <limit>3</limit>
        </action>
        <action method="setColumnCount">
            <columns>3</columns>
        </action>
    </reference>
</catalog_product_view>

Essentially, we are taking advantage of the fact that local.xml is processed at the end and the values set here will override any values set in other XML layout files.

4. Doing different things for logged in vs. not logged in users

Magento provides us with two interesting layout handles: <customer_logged_out> and <customer_logged_in>. We can be really creative in the way we can use these handles to affect our template depending on whether a customer is logged in or not. This also takes the logic out of the phtml files since we can include different content for the same layout block using this approach.

Let’s take the Magento built in stock alert functionality as an example. The default, if enabled, is to provide customers with a way to be alerted when a product comes back in stock by presenting the customer with a link, which when clicked, will add the logged in customer to a notification database. However, the usability of this feature suffers since when a customer is not logged in, they will be redirected to the standard Log In/Create an Account page. The wording on the notification link doesn’t indicate what a customer can expect when they click on it leading to potential frustration.

So, to improve usability, we want to display slightly different wording depending on whether the customer is already logged in or not. For this, we created a new phtml template block we are going to display instead of the default link. Since Magento will not show a Add to Cart button, we also want to show this block in the space of the button:

1
2
3
4
5
6
7
8
9
10
11
12
13
14
15
16
17
18
<catalog_product_view>
    <!-- remove the original alert URL block; we will put it back into the add to cart block below -->
    <reference name="alert.urls">
        <action method="unsetChild">
            <name>productalert.stock</name>
        </action>
    </reference>
    <!-- create our new block as a child block of the addtocart block -->
    <reference name="product.info.addtocart">
        <!-- Block comes from the original stock alert block in productalert.xml -->
        <block type="productalert/product_view" name="productalert.stock" as="productalert_stock" template="magebase/productalert.phtml">
            <action method="prepareStockAlertData"/>
            <action method="setHtmlClass">
                <value>alert-stock link-stock-alert</value>
            </action>
        </block>
    </reference>
</catalog_product_view>

We introduced our own phtml template in template/magebase/productalert.phtml. It contains:

1
2
3
4
5
6
<p class="<?php echo $this->getHtmlClass() ?>">
<?php if ($this->getSignupDesc()) : ?>
    <span class="alert-description"><?php echo $this->getSignupDesc() ?></span>
<?php endif; ?>
    <button type="button" title="<?php echo $this->escapeHtml($this->__($this->getSignupLabel())); ?>" class="button btn-alert" onclick="setLocation('<?php echo $this->escapeHtml($this->getSignupUrl()) ?>')"><span><span><?php echo $this->escapeHtml($this->__($this->getSignupText())); ?></span></span></button>
</p>

We added some more descriptive elements here in addition to the link (we turned it into a button to make it a clear call to action) so the customer can be clear as to what will happen. So, to make this work for the logged out and logged in states, we just need to add the following to our XML:

1
2
3
4
5
6
7
8
9
10
11
12
13
14
15
16
17
18
19
20
21
22
23
24
25
26
27
28
29
30
31
<customer_logged_out>
    <reference name="product.info.addtocart">
        <reference name="productalert.stock">
            <action method="setSignupLabel" translate="value">
                <value>Sign up to get notified when this product is back in stock</value>
            </action>
            <action method="setSignupText" translate="value">
                <value>Sign Up For Alerts</value>
            </action>
            <action method="setSignupDesc" translate="value">
                <value>Log in or create an account to be notified when this product is back in stock.</value>
            </action>
        </reference>
    </reference>
</customer_logged_out>
 
<customer_logged_in>
    <reference name="product.info.addtocart">
        <reference name="productalert.stock">
            <action method="setSignupLabel" translate="value">
                <value>Click to get notified when this product is back in stock</value>
            </action>
            <action method="setSignupText" translate="value">
                <value>Alert Me When In Stock</value>
            </action>
            <action method="setSignupDesc" translate="value">
                <value>You can sign up to be notified when this product is back in stock.</value>
            </action>
        </reference>
    </reference>
</customer_logged_in>

5. Removing, rearranging and replacing template blocks

Often we want to remove some blocks and replace them with our own modified ones as well as rearrange existing blocks.

There are two ways to remove blocks in layout XML:

  1. by using: <remove name="" />
  2. by using: <action method="unsetChild">

It is important that we understand what the difference between the two methods is. Essentially, the main difference is that the two methods operate on different contexts.

<remove name="" /> will operate on a global context, after all the layouts are processed which means that it will remove the named layout block completely, regardless of which layout handle added it. By using this approach, you can’t remove a block from one place and then add it in another.

<action method="unsetChild"> operates on a localized context, specifically, in the context where you use it. So, if you want to remove a specific block from a specific layout handle and possibly insert it at another position or layout handle, you need to use this approach.

As you can see, the difference between the two removal methods will give you a clue as to how you can go about rearranging your template layout. Use remove to get rid of unwanted blocks on a global level:

1
2
3
4
5
6
<default>
    <!-- remove the language and store switcher and footer links blocks, we won't use them -->
    <remove name="store_language" />
    <remove name="store_switcher"/>
    <remove name="footer_links" />
</default>

Use unsetChild to move or rearrange blocks in your layout:

1
2
3
4
5
6
7
8
9
10
11
12
13
    <default>
        <!-- move the breadcrumb block from the top.bar child block back to the template root
(this overrides the modern theme breadcrumb positioning) -->
        <reference name="top.bar">
            <action method="unsetChild">
                <name>breadcrumbs</name>
            </action>
        </reference>
 
        <reference name="root">
            <block type="page/html_breadcrumbs" name="breadcrumbs" as="breadcrumbs"/>
        </reference>
    </default>

This example will replace the default product tabs block from the modern theme with our own tabs:

1
2
3
4
5
6
7
8
9
10
11
12
13
14
15
16
17
18
19
20
21
22
23
24
25
26
27
28
29
30
31
32
<catalog_product_view>
    <reference name="product.info">
        <action method="unsetChild">
            <name>info_tabs</name>
        </action>
        <block type="catalog/product_view_tabs" name="product.info.tabs" as="info_tabs" template="catalog/product/view/tabs.phtml" >
            <action method="addTab" translate="title" module="catalog">
                <alias>upsell_products</alias>
                <title>You may also like</title>
                <block>catalog/product_list_upsell</block>
                <template>catalog/product/list/upsell.phtml</template>
            </action>
            <action method="addTab" translate="title" module="catalog">
                <alias>description</alias>
                <title>Details</title>
                <block>catalog/product_view_description</block>
                <template>catalog/product/view/description.phtml</template>
            </action>
            <!-- neat trick to include a CMS Static block directly in the tab -->
            <action method="addTab" translate="title" module="catalog">
                <alias>shipping</alias>
                <title>Shipping Costs</title>
                <block>cms/block</block>
                <template>null</template>
            </action>
            <!-- define the CMS block ID for the shipping info tab -->
            <block type="cms/block" name="product.info.tabs.shipping" as="shipping">
                <action method="setBlockId"><block_id>tab-product-shipping</block_id></action>
            </block>
        </block>
    </reference>
</catalog_product_view>

Here, I also showed a nice little trick to include a static CMS block directly in the product tab all via layout XML only.

Conclusion

We saw how to utilize a local.xml layout file to manipulate and change the layout of a Magento theme. This powerful approach keeps all your template layout modifications in one single file thus making your modifications easy to find and also ensure an easier upgrade path if and when there is a theme update.

We can change almost all layout aspects of the standard Magento layout however there are some situations when this approach fails. Notably, this manifests itself the minute you want to modify the top.links block. Items in this block are added using the addLink action method so if you are wondering how to remove some links from the default set, the answer is, you can’t! Unfortunately, the page/template_links block class doesn’t implement a 'removeLink' action method so the resort is to remove the whole block using the unsetChild approach and add the links block back with our own links added to it in local.xml.

Another scenario is if you want to remove some of the navigation links from the My Account navigation. The easiest approach is probably to override the layout XML files that add the unwanted links. That’s why my screen shot of the layout folder at the start of this tutorial has some other layout files in it.

If you have any interesting local.xml tips and tricks, by all means share them in the comments section.

Adding Social Networking Buttons to Magento – Updated

Update: There has been a few updates to the code below, especially the Google Buzz code.
——-
I have been building a magento based site over the past few months for a new project I am working on with Ruth. The end product will be an online food store that sell Australian Gourmet Foods.
I spent a while searching around Google trying to figure out how to add social networking buttons into the products page. I basically wanted people to click “Share on Facebook”, “Tweet This” and more recently “Buzz This” and send the product name, the URL and any other text I wanted.
All you really need to know the two pieces of code below that will grab the product name and URL you need to insert into the URL of the code you are going to be placing on your page. I have already inserted this code into each URL.
  • <?php echo $this->htmlEscape($_product->getName()) ?> = This code fetches the product name
  • 
  • <?php echo $_product->getProductUrl() ?> =  This code fetches the Product URL
I have added the below to the view.phtml page, found in templates/catalog/product. You’ll need to decide where you want to add it, so it might take a few times to get it right. Just copy the below code, paste it where you want it displayed on your product page and edit the bits in bold to suit your website.

Twitter

<a title=”Send this page to Twitter!” href=”http://twitter.com/home?status=Check out the <?php echo $this->htmlEscape($_product->getName()) ?> at <?php echo $_product->getProductUrl() ?> @foodoAU” target=”_blank”><img src=”YOUR BUTTON HERE” alt=”Follow foodoAU on Twitter“/></a>

Facebook

<a href=”http://www.facebook.com/sharer.php?u=<?php echo $_product->getProductUrl() ?>&t=Check+this+out” target=”_blank” title=”Share on Facebook”><img src=”YOUR BUTTON HERE” alt=”Share on Facebook”></a>

Google Buzz

<a href=”http://www.google.com/buzz/post?url=<?php echo $_product->getProductUrl() ?>&title=<?php echo $this->htmlEscape($_product->getName()) ?>&srcURL=YOUR URL&srcTitle=YOUR SITE NAME” target=”_blank” rel=”nofollow external” title=”Google Buzz This”><img src=”YOUR BUTTON” ” alt=”Google Buzz This!” /></a>

How to add Currency selector to Magento’s header.

Untitled Document

Since Magento has built in functionality for currencies, it shouldn’t be too hard to create custom currency selector and put it to the header. You might say this tutorial is for beginners, since it’s pretty much straightforward.

You might have noticed the ”Currency Setup” tab in Magento’s Administration under “System->Configuration” menu. There you should select default site currency, and besides that, all currencies you want to support.

Here’s a screenshot of that tab:

After that, you should go to “System->Manage Currency Rates” and set rates for currencies you’ve chosen before. You can use Webservicex to import currency rates from Webservicex service. Here’s how it looks like:

And now, after you’re done with initial setup, let’s go further with modifications to make that output shows in the header. First thing you should do is to create a new template file and put it under “YOUR_PACKAGE/YOUR_THEME/template/currency/currency.phtml”. Put in this content:

1
2
3
4
5
6
7
8
9
10
11
12
13
14
15
<?php if($this->getCurrencyCount() > 1): ?>
<div class="form-language">
    <label for="custom-currency-selector"><?php echo $this->__('Your Currency:') ?></label>
    <select onchange="window.location.href=this.value" name="custom-currency-selector" id="custom-currency-selector">
        <?php foreach ($this->getCurrencies() as $_code => $_name): ?>
        <option value="<?php echo $this->getSwitchCurrencyUrl($_code)?>"
            <?php if($_code == $this->getCurrentCurrencyCode()): ?>
                selected="SELECTED"
            <?php endif; ?>>
            <?php echo $_code ?>
        </option>
        <?php endforeach; ?>
    </select>
</div>
<?php endif; ?>

You can put in line #10 either $_name or $_code, depending what do you want to show in your currency selector. Here you can see how these changes affect to the selector.

Next thing you should do is to tell Magento which template should be used for the selector. You should create “YOUR_PACKAGE/YOUR_THEME/layout/local.xml”, or just append the following content if you already have this file in your theme.

1
2
3
4
5
6
7
8
<?xml version="1.0"?>
<layout version="0.1.0">
    <default>
        <reference name="header">
            <block type="directory/currency" name="custom_currency_selector" template="currency/currency.phtml"/>
        </reference>
    </default>
</layout>

And finally, there’s one more thing you’ll need to do to make the template visible on frontend, Open “YOUR_PACKAGE/YOUR_THEME/template/page/html/header.phtml” (or create new file if there isn’t any) and add the following content:

1
2
3
4
5
6
7
8
9
10
11
12
13
14
15
16
17
18
19
20
<div class="header-container">
    <div class="header">
        <?php if ($this->getIsHomePage()):?>
        <h1 class="logo"><strong><?php echo $this->getLogoAlt() ?></strong><a href="<?php echo $this->getUrl('') ?>" title="<?php echo $this->getLogoAlt() ?>" class="logo"><img src="<?php echo $this->getLogoSrc() ?>" alt="<?php echo $this->getLogoAlt() ?>" /></a></h1>
        <?php else:?>
        <a href="<?php echo $this->getUrl('') ?>" title="<?php echo $this->getLogoAlt() ?>" class="logo"><strong><?php echo $this->getLogoAlt() ?></strong><img src="<?php echo $this->getLogoSrc() ?>" alt="<?php echo $this->getLogoAlt() ?>" /></a>
        <?php endif?>
        <div class="quick-access">
            <?php echo $this->getChildHtml('topSearch') ?>
            <p class="welcome-msg"><?php echo $this->getWelcome() ?> <?php echo $this->getAdditionalHtml() ?></p>
            <?php echo $this->getChildHtml('topLinks') ?>
            <?php echo $this->getChildHtml('store_language') ?>
            <!-- START How to add Currency selector to Magento's header -->
            <?php echo $this->getChildHtml('custom_currency_selector') ?>
            <!-- END   How to add Currency selector to Magento's header -->
        </div>
        <?php echo $this->getChildHtml('topContainer'); ?>
    </div>
</div>
<?php echo $this->getChildHtml('topMenu') ?>

After this, if you save everything, clear the cache and reload the page, you should see something like this:

Note!

By default, Magento is configured to show default currency selector if there is more than one currency set up. You can see that below:

To disable default currency selector you need to add

1
<remove name="currency" />

to default handle in your layout.xml. Then, your local.xml would look like this:

1
2
3
4
5
6
7
8
9
<?xml version="1.0"?>
<layout version="0.1.0">
    <default>
        <reference name="header">
            <block type="directory/currency" name="custom_currency_selector" template="currency/currency.phtml"/>
        </reference>
        <remove name="currency" />
    </default>
</layout>

I hope this helped someone, cheers!

Magento WordPress Integration Recent Posts Block.

Untitled Document
With the release of WordPress Integration 2.0 for Magento eCommerce, a new way of adding recent posts to the homepage was introduced. The new way, while different, allows for control of the sidebar widgets via the WordPress Admin interface (WP Admin > Appearances > Widgets). Although at this time it isn't possible to add recent posts to the homepage using this method, it is still simple enough to add them using XML or the {\{block type="..."}} system; let's take a look how...

Adding A List of WordPress Posts to Magento

The code below will add a simple list of your most recent WordPress posts to your Magento homepage.
?
1
2
3
4
5
6
7
8
9
10
11
12
13
<!--
/**
 * Display a list of your 5 most recent WordPress Posts
 *
 * {\{block type="wordpress/sidebar_widget_posts" name="wordpress.widget.recent_posts" post_count="5" title="Latest Posts" template="wordpress/sidebar/widget/posts.phtml"}}
 */
-->
<reference name="content">
    <block type="wordpress/sidebar_widget_posts" name="wordpress.widget.recent_posts" as="recent_posts" template="wordpress/sidebar/widget/posts.phtml">
        <action method="setTitle"><title>Latest Posts</title></action>
        <action method="setPostCount"><post_count>5</post_count></action>
    </block>
</reference>
Let's take a look at what the above code actually does...
Line 1: This line sets the block reference, which effectively positions the block in your site. For this example, we have told Magento to display our block in the content block, which is the main content area of the page.
Line 2: Firstly this line sets the block type, in this case wordpress/sidebar_widget_posts. This is the block type that will load in your recent posts (to see what other widget blocks are available, take a look in app/code/community/Fishpig/Wordpress/Block/Sidebar/Widget/). The next parameters are name and as. These two parameters name the block and provide tokens with which you can refer to the block from your XML and PHP code. The last parameter on this line, template, allows you to set the template of the block. For this block, we have used the default template, however, if you wanted, you could create a custom template and refer to that using this parameter.
Line 3: Here we set the title of the block. Feel free to change the 'Latest Posts' text to anything you want.
Line 4: Here we set the number of posts that we want to display. The code above instructs Magento to display the latest 5 published posts but you can set it to any number you wish.
Line 5: This line closes the block tag and must be included.
Line 6: This line closes the reference tag and must be included.
To try this code out, login to your Magento Admin, go to your Homepage CMS Page and copy the code into the Layout Update XML field and save the page. Now, if you go to your homepage, you should see your recent posts block.

Filtering the WordPress Post List by a Category ID

Sometimes you may only want to show recent posts from a certain category instead of listing all posts. Using the above the code, we can add 1 extra line to accomplish this.
?
1
2
3
4
5
6
7
8
9
10
11
12
13
14
15
<!--
/**
 * Display a list of your 5 most recent WordPress Posts
 * from the Category with the ID of 1
 *
 * {\{block type="wordpress/sidebar_widget_posts" name="wordpress.widget.recent_posts" post_count="5" title="Latest Posts" category_id="1" template="wordpress/sidebar/widget/posts.phtml"}}
 */
-->
<reference name="content">
    <block type="wordpress/sidebar_widget_posts" name="wordpress.widget.recent_posts" as="recent_posts" template="wordpress/sidebar/widget/posts.phtml">
        <action method="setTitle"><title>Latest Posts</title></action>
        <action method="setPostCount"><post_count>5</post_count></action>
        <action method="setCategoryId"><id>1</id></action>
    </block>
</reference>
In the above example, we have added line 5, which simply tells Magento to only display posts from the WordPress category with the ID of 1.

Filtering the WordPress Post List by an Author ID

Another popular filter is the Author ID filter, which as the name suggest, allows you to display posts by a specific author.
?
1
2
3
4
5
6
7
8
9
10
11
12
13
14
15
<!--
/**
 * Display a list of your 5 most recent WordPress Posts
 * from the Author with the ID of 1
 *
 * {\{block type="wordpress/sidebar_widget_posts" name="wordpress.widget.recent_posts" post_count="5" title="Latest Posts" author_id="1" template="wordpress/sidebar/widget/posts.phtml"}}
 */
-->
<reference name="content">
    <block type="wordpress/sidebar_widget_posts" name="wordpress.widget.recent_posts" as="recent_posts" template="wordpress/sidebar/widget/posts.phtml">
        <action method="setTitle"><title>Latest Posts</title></action>
        <action method="setPostCount"><post_count>5</post_count></action>
        <action method="setAuthorId"><id>1</id></action>
    </block>
</reference>
In the above example, we have added line 5, which simply tells Magento to only display posts from the WordPress author with the ID of 1.

Filtering by a Category ID and a Author ID

To display posts written by a specific author and published in a specific category, use the following code.
?
1
2
3
4
5
6
7
8
9
10
11
12
13
14
15
16
<!--
/**
 * Display a list of your 5 most recent WordPress Posts
 * from the Author with the ID of 1 & category with the ID of 1
 *
 * {\{block type="wordpress/sidebar_widget_posts" name="wordpress.widget.recent_posts" post_count="5" title="Latest Posts" author_id="1" category_id="1" template="wordpress/sidebar/widget/posts.phtml"}}
 */
-->
<reference name="content">
    <block type="wordpress/sidebar_widget_posts" name="wordpress.widget.recent_posts" as="recent_posts" template="wordpress/sidebar/widget/posts.phtml">
        <action method="setTitle"><title>Latest Posts</title></action>
        <action method="setPostCount"><post_count>5</post_count></action>
        <action method="setCategoryId"><id>1</id></action>
        <action method="setAuthorId"><id>1</id></action>
    </block>
</reference>

Display Post Excerpt and Other Post Information

By making some small changes to the XML, you can display more information about each post. The following code illustrates this.
?
1
2
3
4
5
6
7
8
9
10
11
12
13
14
15
16
17
18
<!--
/**
 * Display a list of your 5 most recent WordPress Posts
 * Also include post excerpt, date and comment count
 *
 * {\{block type="wordpress/sidebar_widget_posts" name="wordpress.widget.recent_posts" post_count="5" title="Latest Posts" excerpt="on" excerpt_length="1" date="on" comment_num="on" template="wordpress/sidebar/widget/categoryposts.phtml"}}
 */
-->
<reference name="content">
    <block type="wordpress/sidebar_widget_posts" name="wordpress.widget.recent_posts" as="recent_posts" template="wordpress/sidebar/widget/categoryposts.phtml">
        <action method="setTitle"><title>Latest Posts</title></action>
        <action method="setPostCount"><post_count>5</post_count></action>
        <action method="setExcerpt"><display>on</display></action>
        <action method="setExcerptLength"><length>30</length></action>
        <action method="setDate"><date>on</date></action>
        <action method="setCommentNum"><comments>on</comments></action>
    </block>
</reference>
The above code includes the post excerpt with a limit of 30 words, the post date and the comment count for the post! Notice that the template has changed from posts.phtml to categoryposts.phtml. This template is actually used by the Category Posts widget but can be used anywhere on the site using the above XML.

Need More Help?

If you're not a developer, this article might not make much sense to you. If that is the case, we can set up a WordPress recent posts block for you. For more information about this service, please click here.

Choose customer group on checkout in Magento.

copy config.xml from /app/code/core/Mage/Customer/etc/ to app/code/local/Customer/etc/ and modify like below ( add group_id node ):

<fieldset>
    ...
    <customer_account>
    <email><create>1</create><update>1</update></email>
    <group_id><create>1</create><update>1</update></group_id>
    <!-- add above line -->
    </customer_account>
    ...
</fieldset>

Open register.phtml from /app/design/frontend/[YOUR_TEMPLATE]/customer/form/ and add the following code block somewhere which the field that you want to appear :

<div class="input-box">
   <label for="group_id"><?php echo $this->__('Your customer group') ?>
      <span class="required">*</span> 
   </label>
   <select name="group_id" id="group_id" title="<?php echo $this->__('Customer Groups') ?>" class="validate-group required-entry input-text" />
   <?php $groups = Mage::helper('customer')->getGroups()->toOptionArray(); ?>
   <?php foreach($groups as $group){ ?>
       <option value="<?php print $group['value'] ?>">
           <?php print $group['label'] ?>
       </option>
   <?php } ?>
   </select>
</div>

jQuery conflict with prototype in Magento.

Hi all,

I have got a good solution to prevent conflict jquery with prototype in magento

I have added the following code in page.xml after

<action method="addJs"><script>mage/cookies.js</script></action>

this line and it's working fine.


<block type="core/text" name="google.cdn.jquery">
        <action method="setText">
            <text><![CDATA[<script type="text/javascript" src="https://ajax.googleapis.com/ajax/libs/jquery/1.6.2/jquery.min.js"></script>
            <script type="text/javascript">jQuery.noConflict();</script>]]>
            </text>
        </action>
    </block>

How to setup special promotions in Magento Commerce.

This tutorial will show you how to manage special promotions in Magento Commerce, and assumes you're already logged in to Magento
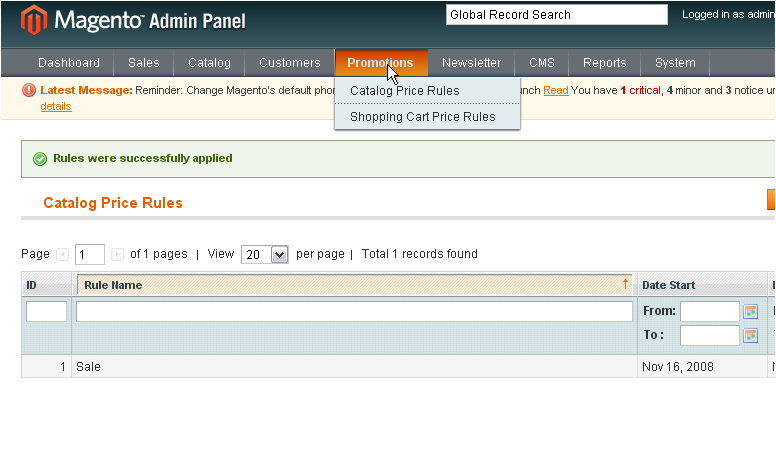
1) To add a catalog promotion, go to Promotions... and select Catalog Price Rules

This page will show you all of the catalog price rules that have been added

2) To add a new rule, click this button

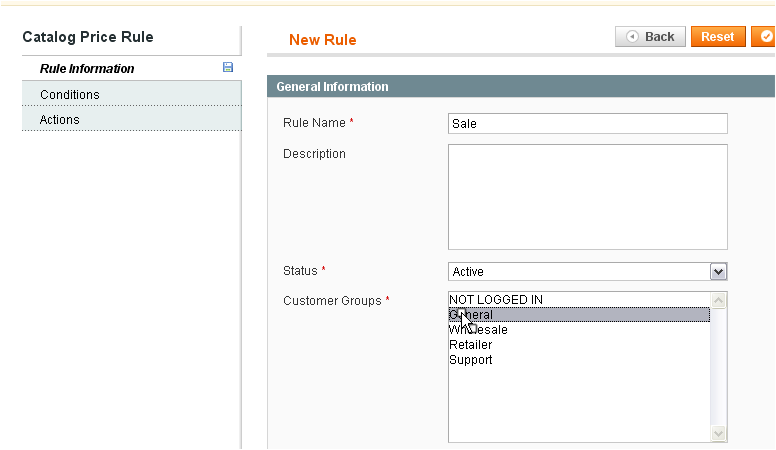
3) Enter a name for the new rule

4) Choose whether the status of the promotion is active or inactive

5) Hold down the control key and click to select the customer groups that this promotion will apply to

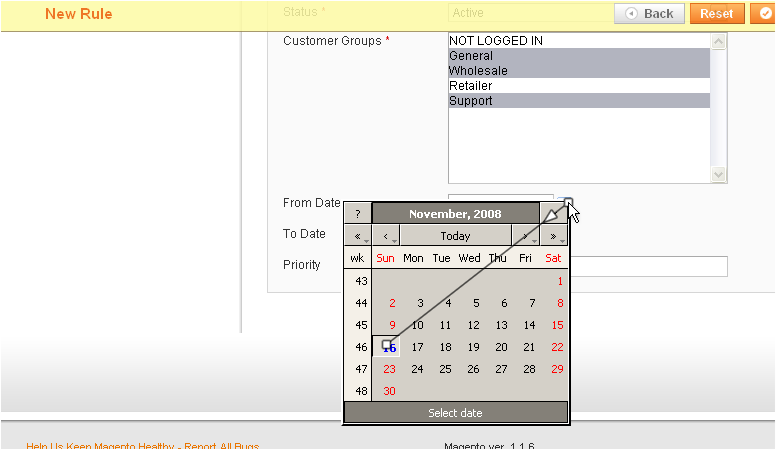
6) You can choose the start and end date of the promotion from the pop-up calendar

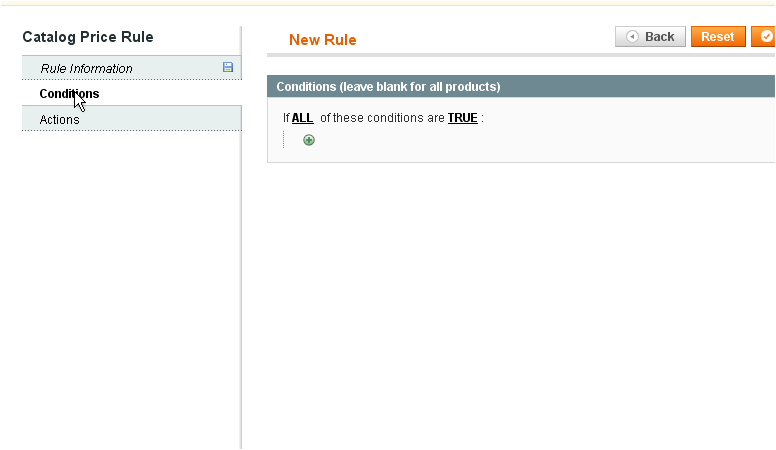
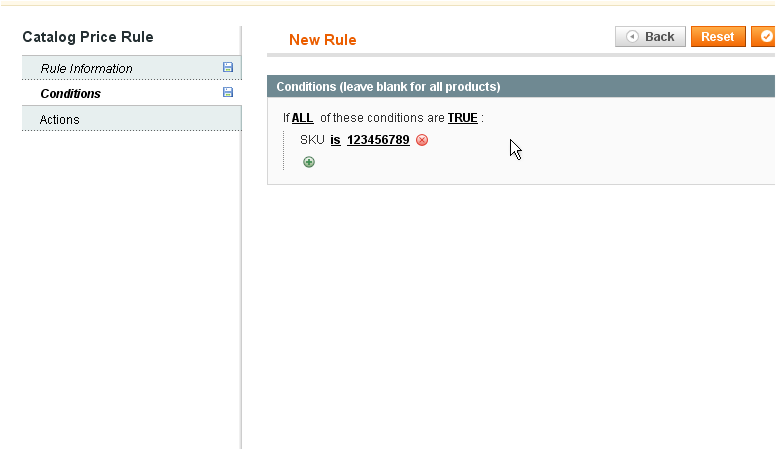
7) Click Conditions

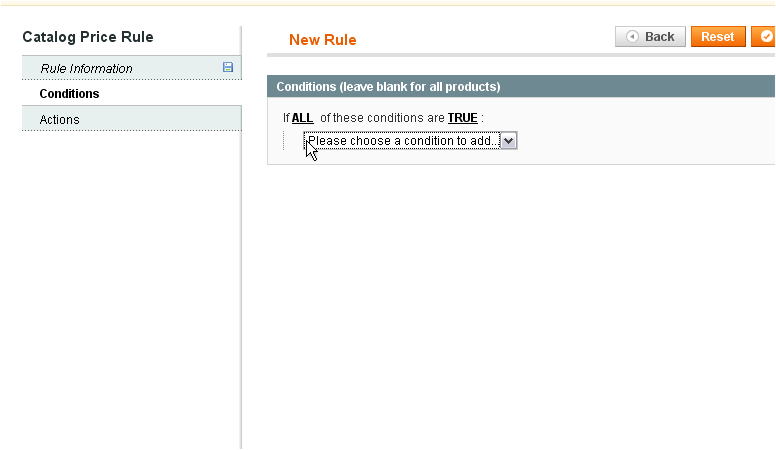
8) Click the plus sign to add a condition

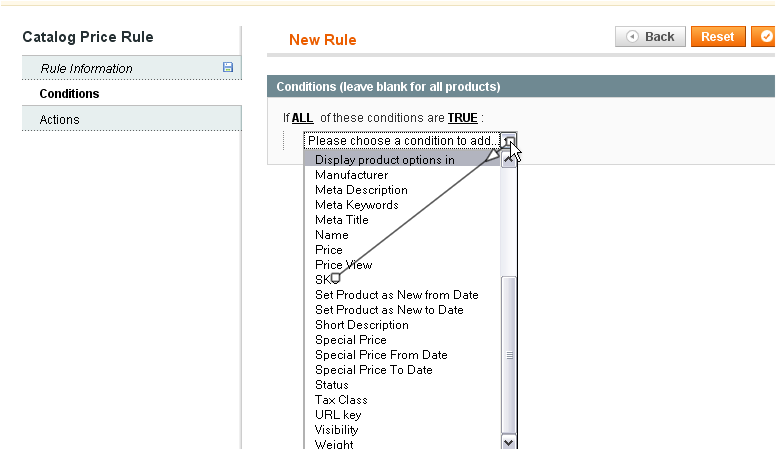
9) Choose a condition to add

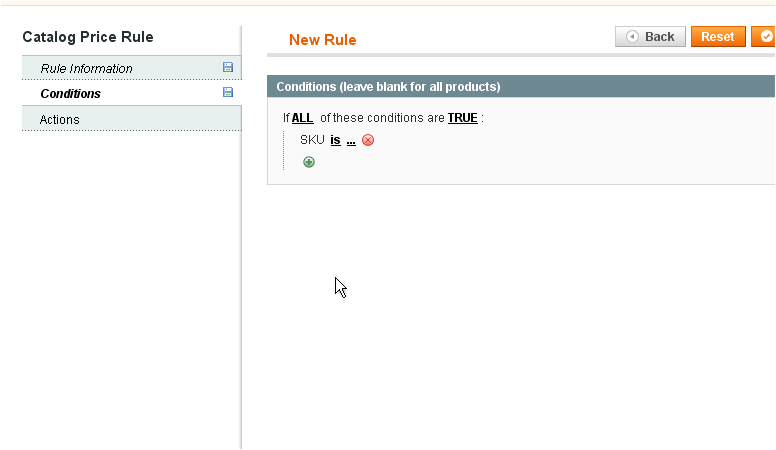
10) Click the dots to finish the condition

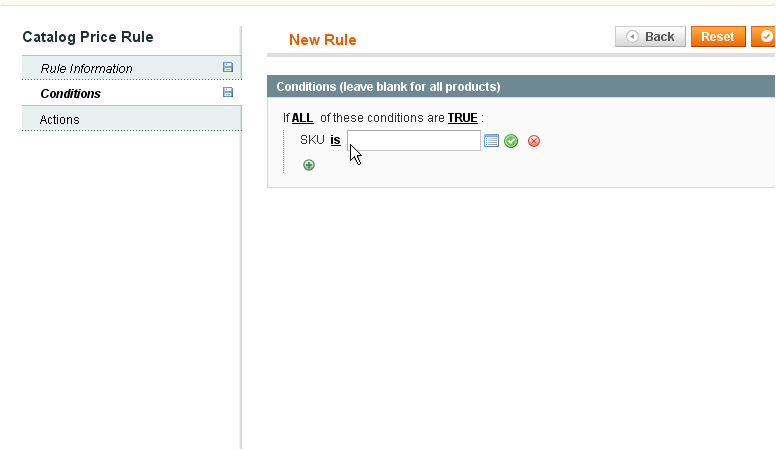
11) Click to search for the product's SKU

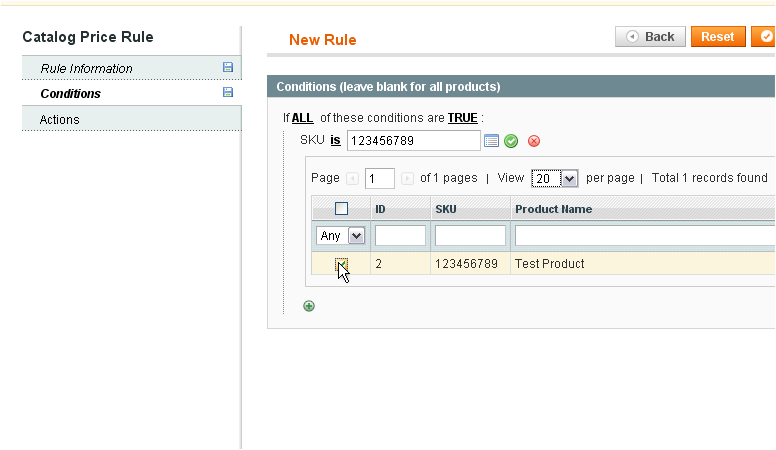
12) Select the correct product

13) Click the checkmark to apply the changes

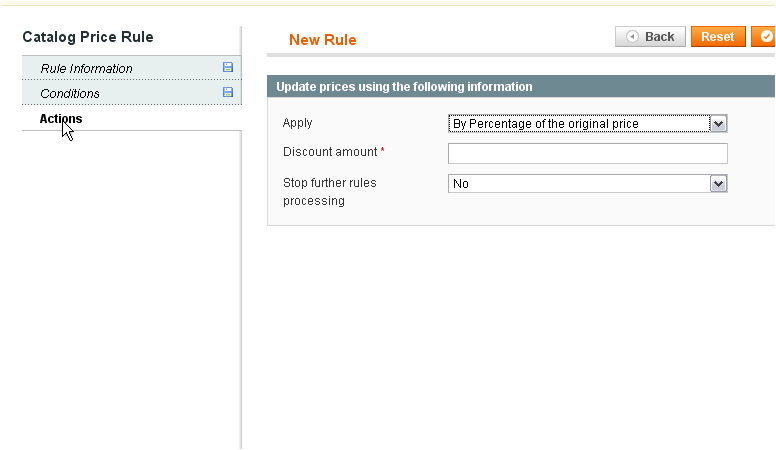
14) Go to Actions

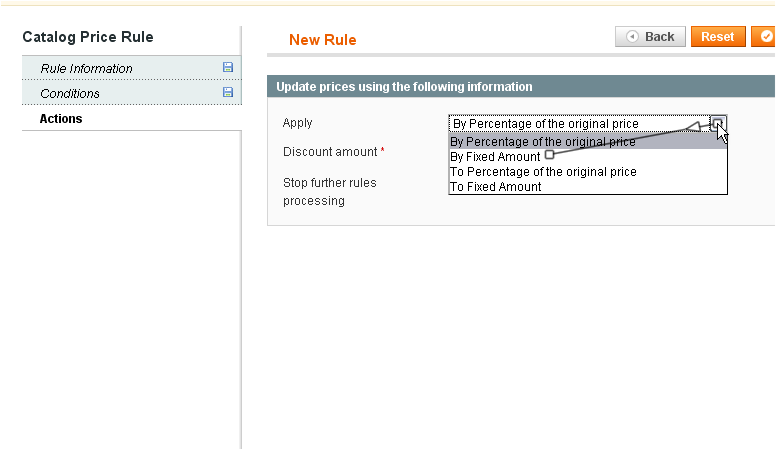
15) Select what the rule should be applied to

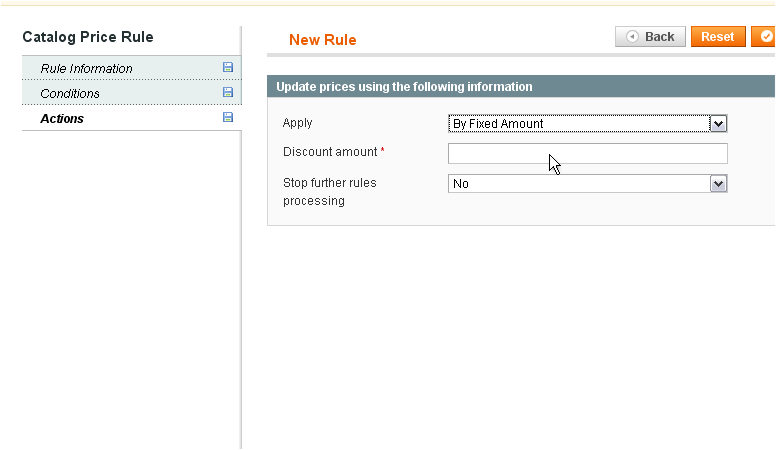
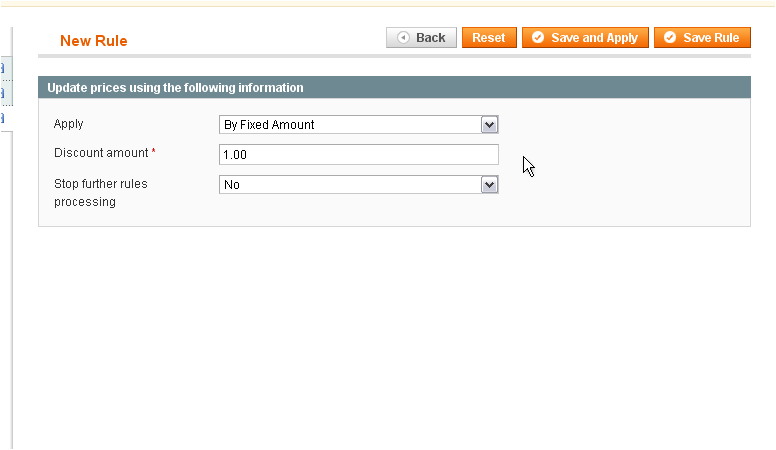
16) Enter the discount amount

17) Click Save Rule

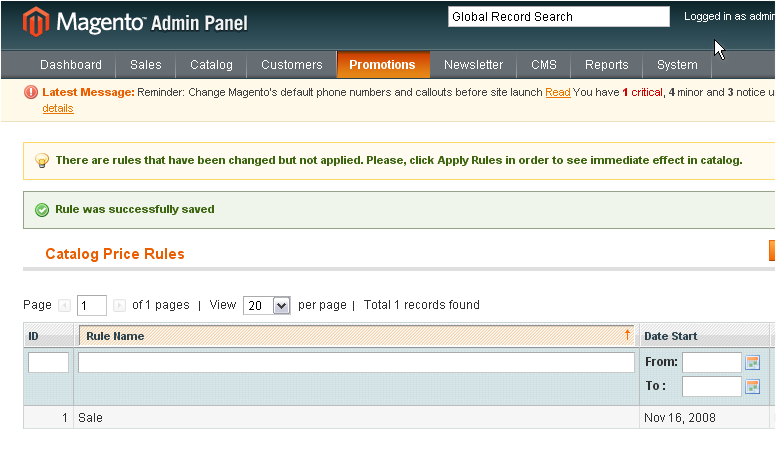
The rule has been saved but not applied

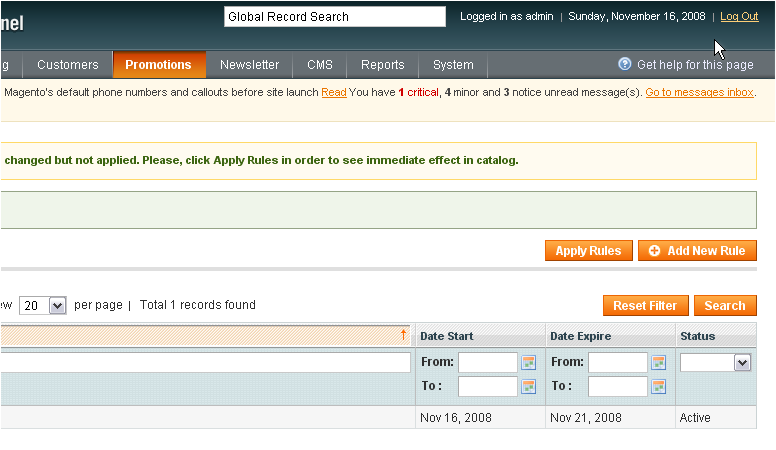
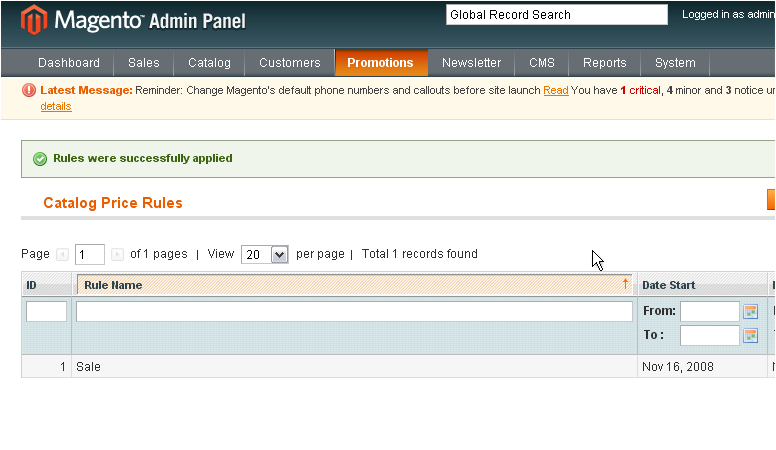
18) Click Apply Rules

The rule has now been applied

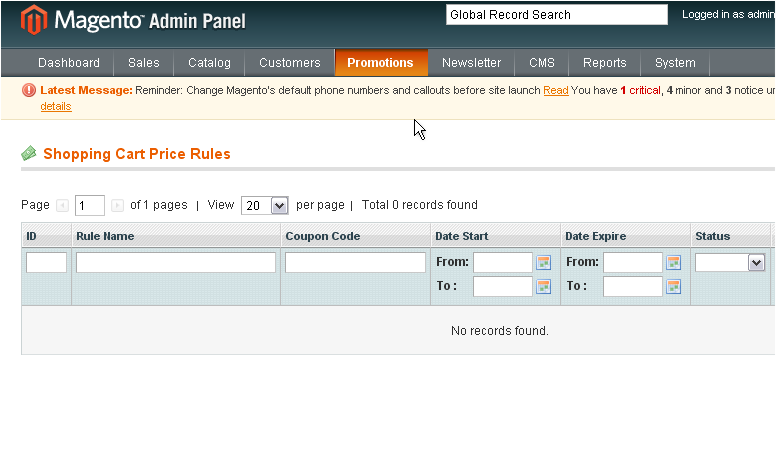
19) To add a shopping cart promotion, go to Promotions... and select Shopping Cart Price Rules

This page will show all the shopping cart promotions that have been created

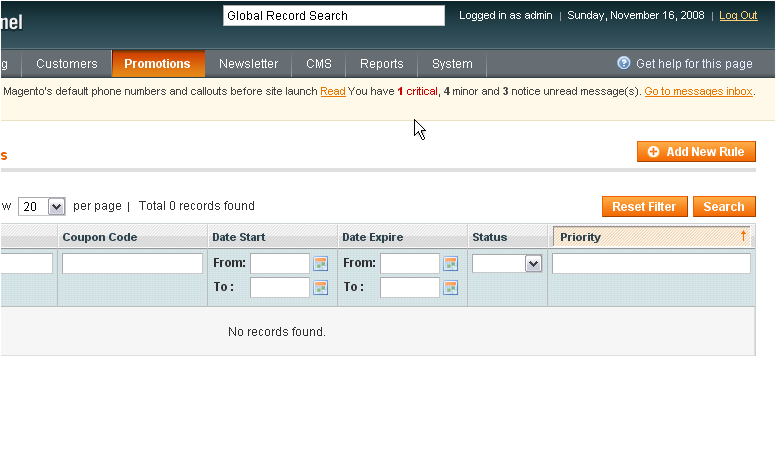
20) To add a new rule, click this button

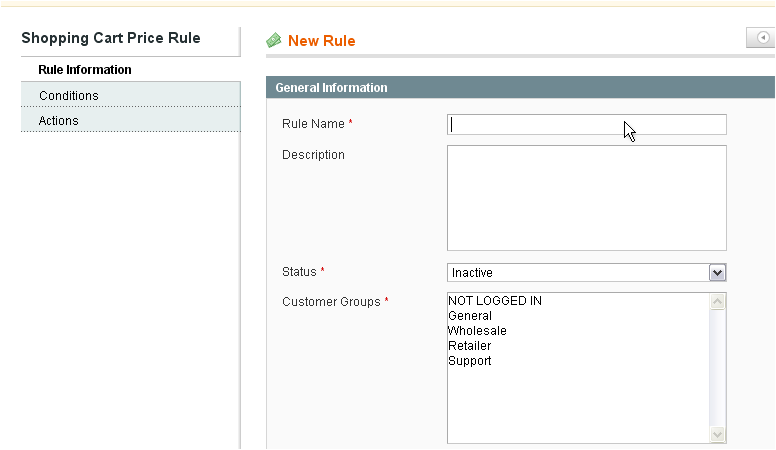
21) Enter a name for the rule

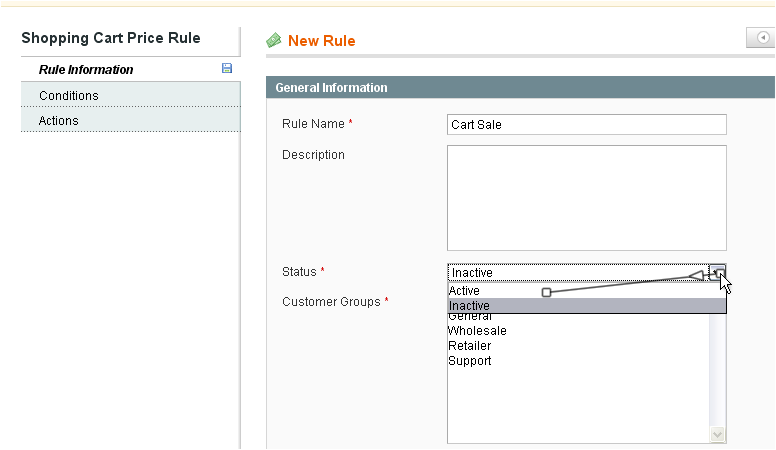
22) Choose whether the promotion status is active or inactive

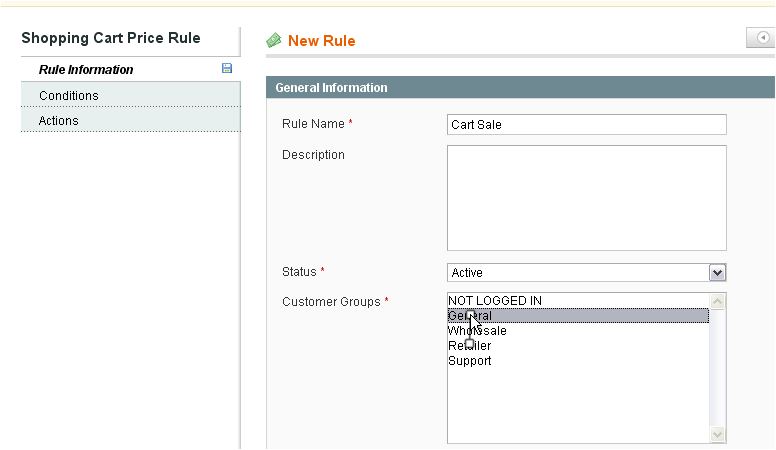
23) Hold down the control key and click to select the customer groups this promotion will apply to

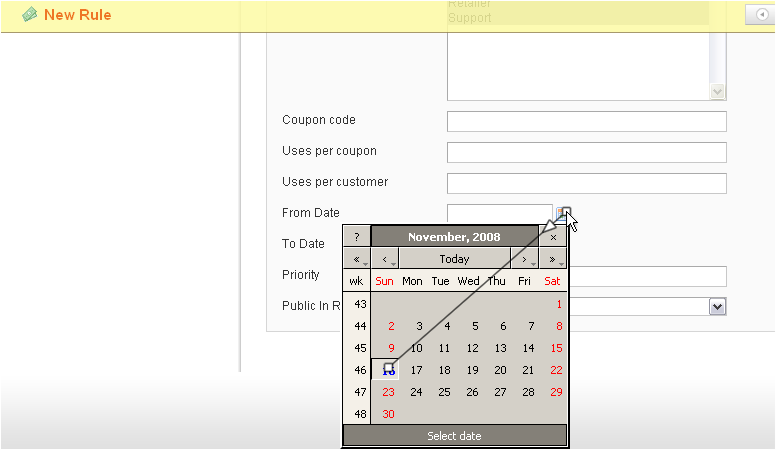
24) You can select the start and end dates for this promotion

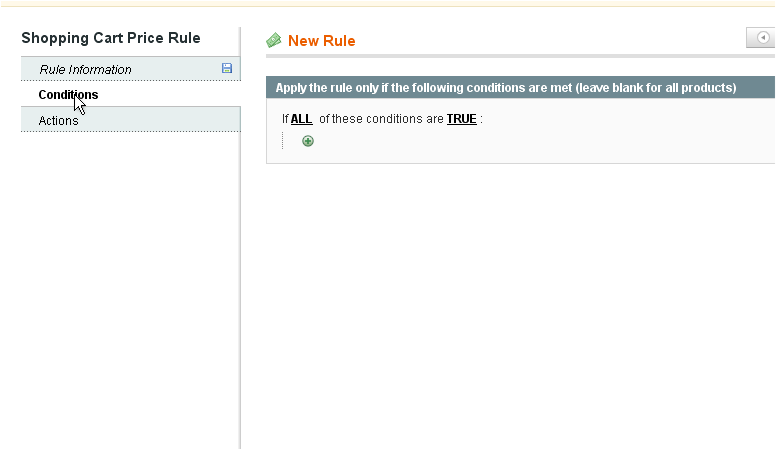
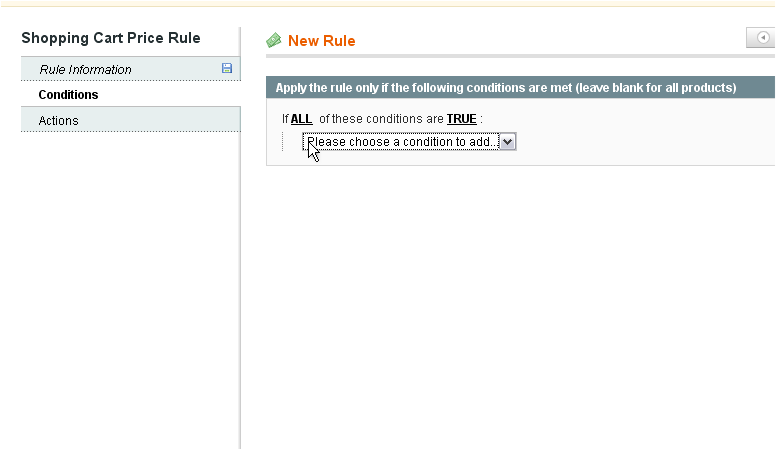
25) Click Conditions

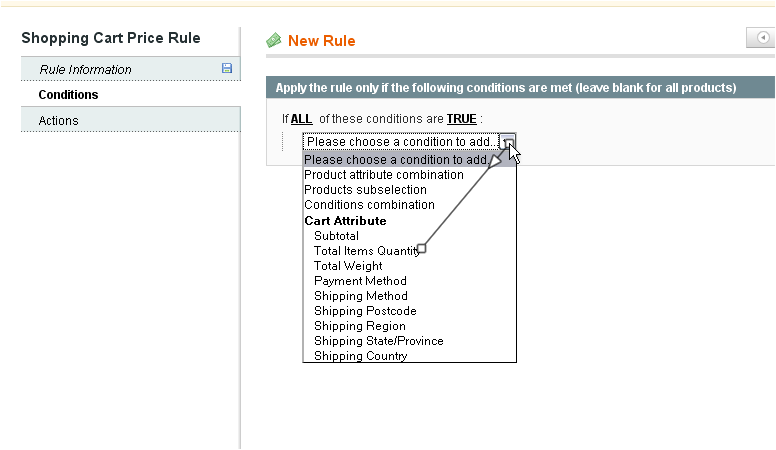
26) Click the plus sign to add a condition

27) Select a condition from the list

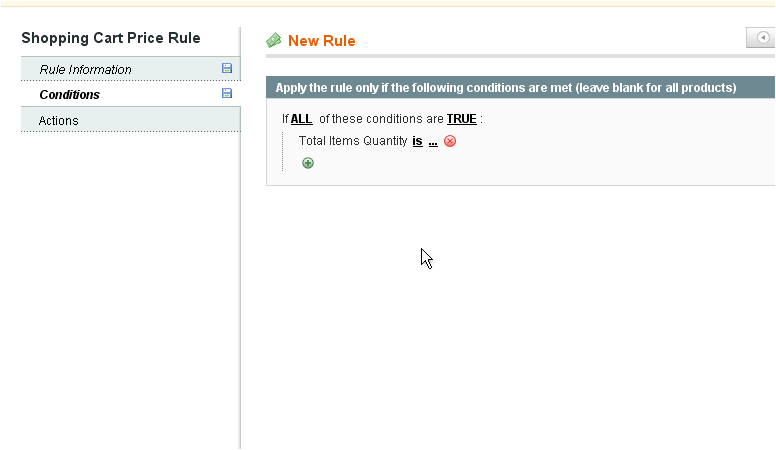
28) Click the dots to complete the condition

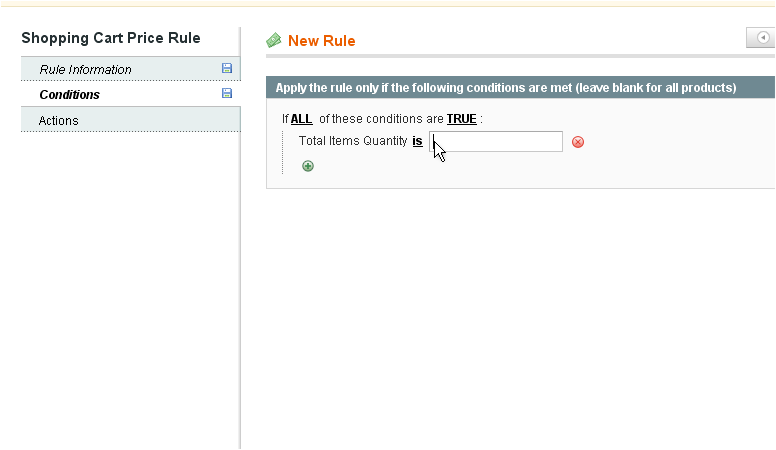
29) Type in a value

30) Go to Actions

31) Select what the new rule will apply to

32) Enter the discount amount

33) Click Save Rule

The new rule has been saved and applied

This is the end of the tutorial. You now know how to setup special promotions in Magento Commerce

WorldPay extension configuration.
After downloading and installing the WorldPay extension via Magento Connect visit worldpay.com and log into your merchant account.

Go to the installation menu and select your Select Junior installation for setup.

1. Enter the “Payment Response URL” like this: http://[yourdomain.com]/worldpay/processing/response/
2. Check “Payment Response enabled?”
3. Check “Enable the Shopper Response”
4. Choose an “Payment Response password” and confirm it.
5. Choose an “MD5 secret for transactions” and confirm it.
To configure dynamic payment response support for multi-store setups see Worldpay knowledge base documentation .

Go back to the Magento backend and switch to “System/Configuration/Sales/Payment Methods”. Enable the WorldPay module and enter the information from the WorldPay setup.

Go to the frontend and test the payment module in the checkout.

Sunday, 5 May 2013

Magento – Add breadcrumbs on customer account area pages.

Breadcrumbs are really good way to navigate through the site and provide links back to each previous page the user navigated through to get to the current page. Magento’s default themes does not offer breadcrums in the customer account area. Adding breadcrumbs in the account area may be an added advantage for the users and will help them in navigation. It will give an visual aid to the website as well. Breadcrumbs can be added easily in the customer account area using the local.xml file. Each layout is associated to a module and customer area have multiple modules linked, so in order to add breadcrumbs in all the pages in customer account section, we need add multiple layout updates in out local.xml file.
Magento themes are fully managed by the layout.xml files. Layouts are created per module basis. These files control the structure and behavior of the theme. Layout files resides under app/design/frontend/your_interface/your_theme/layout/. Look and feel of the theme can be easily changed by just modifying the layout.xml files even without touching the .phtml templates. And here comes the power of local.xml layout file. After preparing the layout configuration of all the layout files, its local.xml thats merged at the end of the layout configuration. Local.xml can be used to modify any of the layout section of modules.
Steps to add Breadcrumbs in the Customer Account Area

1. First of all create a local.xml file inside your themes, layout directory. The path of the local.xml will be app/design/frontend/your_interface/your_theme/layout/local.xml. If you already have a local.xml layout file in your layout directory than use the existing file. Alternatively download the Local.xml from here.
Local.xml have the standard layout tag under which all the layout modifications will be defined. Add the following in your empty local.xml file.
<?xml version="1.0"?>
<layout version="0.1.0">

</layout>
Default crumbs on every page in customer account
Now we are going to add default crumbs – Home and My Account which will be displayed on all the pages. Open the file app/design/frontend/your_interface/your_theme/layout/local.xml
Now inside <layout version="0.1.0"> tag add the below given code. Local.xml will look like this now.
<?xml version="1.0"?>
<layout version="0.1.0">

    <!--
    add default crumbs to display in all the customer account pages
    this will add Home / My Account crubms.
    -->
    <customer_account translate="label">
        <reference name="breadcrumbs">
            <action method="addCrumb"><crumbName>Home</crumbName><crumbInfo><label>Home</label><title>Home</title><link>/home</link></crumbInfo></action>
              <action method="addCrumb"><crumbName>My Account</crumbName><crumbInfo><label>My Account</label><title>My Account</title><link>/customer/account/</link></crumbInfo></action>
        </reference>
    </customer_account>

</layout>
Refresh the magento cache. This code will add the default breadcrumbs “Home / My Account” on every page in customer account area.
Add “Home / My Account / Dashboard” crumb on Account Dasboard page.
Open the file app/design/frontend/your_interface/your_theme/layout/local.xml and after the </customer_account> and add this code.
    <!--Add Dashboard crumb on My Dashboard page-->
    <customer_account_index translate="label">
        <reference name="breadcrumbs">
            <action method="addCrumb"><crumbName>Dashboard</crumbName><crumbInfo><label>Dashboard</label><title>Dashboard</title></crumbInfo></action>
        </reference>
    </customer_account_index>
Here we only added a single crumb Dashboard which will automatically be added with the default breadcrumbs.
Complete Local.xml file for Customer Account Breadcrumbs
As you have seen, we need to add layout updates for every page one by one. So rather illustrating each layout update individually, i am giving the complete code of the local.xml. Just copy the whole code as is and put in your local.xml file. Refresh the magento cache and its ready. Download the ready to go Local.xml file.
<?xml version="1.0"?>
<layout version="0.1.0">

    <!--
    ///////////////////////////////////////////////////////
    ///////  BREADCRUMBS IN CUSTOMER ACCOUNT AREA  ////////
    ///////////////////////////////////////////////////////
    add default crumbs to display in all the customer account pages
    this will add Home / My Account crubms.
    -->
    <customer_account translate="label">
        <reference name="breadcrumbs">
            <action method="addCrumb"><crumbName>Home</crumbName><crumbInfo><label>Home</label><title>Home</title><link>/home</link></crumbInfo></action>
              <action method="addCrumb"><crumbName>My Account</crumbName><crumbInfo><label>My Account</label><title>My Account</title><link>/customer/account/</link></crumbInfo></action>
        </reference>
    </customer_account>

    <!-- ACCOUNT SECTIONS -->
    <!--Add Dashboard crumb on My Dashboard page-->
    <customer_account_index translate="label">
        <reference name="breadcrumbs">
            <action method="addCrumb"><crumbName>Dashboard</crumbName><crumbInfo><label>Dashboard</label><title>Dashboard</title></crumbInfo></action>
        </reference>
    </customer_account_index>

    <!--Add Account Information crumb on Account Information page-->
    <customer_account_edit translate="label">
        <reference name="breadcrumbs">
            <action method="addCrumb"><crumbName>Account Information</crumbName><crumbInfo><label>Account Information</label><title>Account Information</title></crumbInfo></action>
        </reference>
    </customer_account_edit>

    <!-- ADDRESS BOOK -->
    <customer_address_index translate="label">
        <reference name="breadcrumbs">
            <action method="addCrumb"><crumbName>Address Book</crumbName><crumbInfo><label>Address Book</label><title>Address Book</title></crumbInfo></action>
        </reference>
    </customer_address_index>

    <customer_address_form translate="label">
        <reference name="breadcrumbs">
            <action method="addCrumb"><crumbName>Address Book</crumbName><crumbInfo><label>Address Book</label><title>Address Book</title><link>/customer/address/</link></crumbInfo></action>
            <action method="addCrumb"><crumbName>Add/Edit Address</crumbName><crumbInfo><label>Add/Edit Address</label><title>Add/Edit Address</title></crumbInfo></action>
        </reference>
    </customer_address_form>

    <!-- MY ORDERS -->
    <sales_order_history translate="label">
        <reference name="breadcrumbs">
            <action method="addCrumb"><crumbName>My Orders</crumbName><crumbInfo><label>My Orders</label><title>My Orders</title></crumbInfo></action>
        </reference>
    </sales_order_history>

    <sales_order_view translate="label">
        <reference name="breadcrumbs">
            <action method="addCrumb"><crumbName>My Orders</crumbName><crumbInfo><label>My Orders</label><title>My Orders</title><link>/sales/order/history/</link></crumbInfo></action>
            <action method="addCrumb"><crumbName>Order View</crumbName><crumbInfo><label>Order View</label><title>Order View</title></crumbInfo></action>
        </reference>
    </sales_order_view>

    <!-- BILING AGREEMENT -->
    <sales_billing_agreement_index>
        <reference name="breadcrumbs">
            <action method="addCrumb"><crumbName>Billing Agreements</crumbName><crumbInfo><label>Billing Agreements</label><title>Billing Agreements</title></crumbInfo></action>
        </reference>
    </sales_billing_agreement_index>

    <sales_recurring_profile_index>
        <reference name="breadcrumbs">
            <action method="addCrumb"><crumbName>Recurring Profiles</crumbName><crumbInfo><label>Recurring Profiles</label><title>Recurring Profiles</title></crumbInfo></action>
        </reference>
    </sales_recurring_profile_index>

    <!-- PRODUCT REVIEW -->
    <review_customer_index translate="label">
        <reference name="breadcrumbs">
            <action method="addCrumb"><crumbName>My Product Reviews</crumbName><crumbInfo><label>My Product Reviews</label><title>My Product Reviews</title></crumbInfo></action>
        </reference>
    </review_customer_index>

    <!-- MY TAGS -->
    <tag_customer_index translate="label">
        <reference name="breadcrumbs">
            <action method="addCrumb"><crumbName>My Tags</crumbName><crumbInfo><label>My Tags</label><title>My Tags</title></crumbInfo></action>
        </reference>
    </tag_customer_index>

    <wishlist_index_index translate="label">
        <reference name="breadcrumbs">
            <action method="addCrumb"><crumbName>My Wishlist</crumbName><crumbInfo><label>My Wishlist</label><title>My Wishlist</title></crumbInfo></action>
        </reference>
    </wishlist_index_index>

    <downloadable_customer_products translate="label">
        <reference name="breadcrumbs">
            <action method="addCrumb"><crumbName>Downloadable Customer Products</crumbName><crumbInfo><label>Downloadable Customer Products</label><title>Downloadable Customer Products</title></crumbInfo></action>
        </reference>
    </downloadable_customer_products>

    <newsletter_manage_index translate="label">
        <reference name="breadcrumbs">
            <action method="addCrumb"><crumbName>Newsletter Manage</crumbName><crumbInfo><label>Newsletter Manage</label><title>Newsletter Manage</title></crumbInfo></action>
        </reference>
    </newsletter_manage_index>
</layout>
As you have notices that after adding default crumbs “Home / My Account“, its all just common code used to create the current active crumb. Url of the page can indicates which module tag need to be updated. For example url http://www.sitename.com/newsletter/manage/ indicates that <newsletter_manage_index translate="label"> tag will be updated.

Magento 1.7 Configurable Product Export Fix.

There is a known issue affecting both the Magento Community and Enterprise Edition export system. I have personally tested this fix on Magento Community v1.7.0.2 and Magento Enterprise v1.12.0.2, but I'm sure it will work on any version that is having the same symptoms.
The issue is with the core Import/Export functionality found in System > Import/Export > Export menu item in the Magento backend. If you have configurable products that are configurable by only 1 attribute, you won't experience difficulities. However, if you have a configurable product with multiple configurable attributes (i.e. a T-Shirt configurable by both size and color) then you will notice that your export file only contains data about one configurable attribute. This data can be found in the _super_attribute_code and _super_attribute_option columns. As in the case of my T-Shirt example, these columns would only contain data about the size attribute options, and nothing about color.
To fix this issue we must override one of Magento's core class files, at least until they come out with a newer patched version. We never touch core Magento files, so what we are going to do is replicate this file in the local code pool and make our changes there. From your root Magento install directory, copy the file
app/code/core/Mage/Catalog/Model/Resource/Product/Type/Configurable.php
to
app/code/local/Mage/Catalog/Model/Resource/Product/Type/Configurable.php
Now, open up the Configurable.php file you just copied to the local code pool and navigate to line 223. This line should read
$attributesOptionsData[$superAttribute->getAttributeId()] = $this->_getReadAdapter()->fetchAssoc($select);
You need to change this line to read
$attributesOptionsData[$superAttribute->getAttributeId()] = $this->_getReadAdapter()->fetchAll($select);
Now, clear your cache and try the export again. You should see all your configurable attribute data in the file now. And now, my T-Shirts have both the size and color attribute associations in the export file. Once Magento fixes this issue in a later release, just remember to delete your local copy of Configurable.php.

How to show billing and shipping details on order review page.

Hi All,
I happy to assist you people.
please follow below steps to get progress bar on ‘order review’ block.
replace following (checkout.xml)::::::::::
<block type="checkout/onepage_review" name="checkout.onepage.review" as="review" template="checkout/onepage/review.phtml">
<block type="checkout/agreements" name="checkout.onepage.agreements" as="agreements" template="checkout/onepage/agreements.phtml"/>
</block>
with:::::::::::
<block type="checkout/onepage_review" name="checkout.onepage.review" as="review" template="checkout/onepage/review.phtml">
<block type="checkout/agreements" name="checkout.onepage.agreements" as="agreements" template="checkout/onepage/agreements.phtml"/>

<block type="page/html_wrapper" name="checkout.progress.wrapper" as="checkout_progress">
<action method="setElementId"><value>checkout-progress-wrapper</value></action>
<block type="checkout/onepage_progress" name="checkout.progress" before="-" template="checkout/onepage/progress.phtml"/>
</block>
</block>
and call this block on checkout/onepage/review.phtml::::::::::::::::::::::::::::::::::
<?php echo $this->getChildHtml('checkout_progress') ?>
Thats it.
Magento had default textbox for Quantity but some time we require to add the qty box  with increment value without entering the value in textbox.We can add the followimg code in cart or view page


1) Add the one new file called jquery.qty.js and enter the following code

jQuery(document).ready(function(){
jQuery("div.quantity").append('<input type="button" value="+" id="add1" class="plus" />').prepend('<input type="button" value="-" id="minus1" class="minus" />');
        jQuery(".plus").click(function()
        {
            var currentVal = parseInt(jQuery(this).prev(".qty").val());
            if (!currentVal || currentVal=="" || currentVal == "NaN") currentVal = 1;
          jQuery(this).prev(".qty").val(currentVal + 1);
 
        });
        jQuery(".minus").click(function()
       {
            var currentVal = parseInt(jQuery(this).next(".qty").val());
            if (currentVal == "NaN") currentVal = 1;
            if (currentVal > 1)
            {
                jQuery(this).next(".qty").val(currentVal - 1);
            }
        });
  
        });
 
and place as per your theme folder structure

2)Add the Following
If you want in cart page open app/design/frontend/default/yourtheme/template/catalog/prdouct/view/addtocart.phtml search for qty code and place div like this
 
<div class="quantity">    
        <input name="cart[<?php echo $_item->getId() ?>][qty]" value="<?php echo $this->getQty() ?>" size="2" title="<?php echo $this->__('Qty') ?>" class="input-text qty" maxlength="12" />
</div>
 
IF u want in view page open app/design/frontend/default/yourtheme/template/checkout/cart/item/default.phtml search for qty code and place div like this
 
<div class="quantity">
<input type="text" name="qty" id="qty" maxlength="12" value="<?php echo $this->getProductDefaultQty() * 1 ?>" title="<?php echo $this->__('Qty') ?>" class="input-text qty" />
</div>
 
Just check you will get the incerement box in cart and view page

Hope this will help you!